10 Nisan 2015 Cuma

How to Create Vector Sun


This tuttorial is from
http://www.webdesign.org/vector-graphics/adobe-illustrator/how-to-create-vector-sun-rays.18455.html


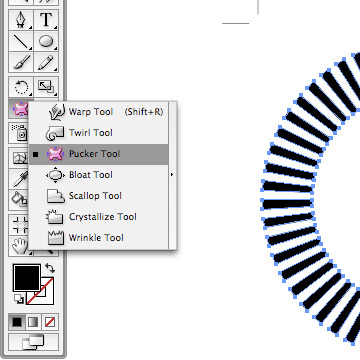
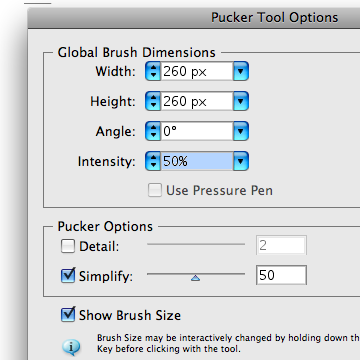
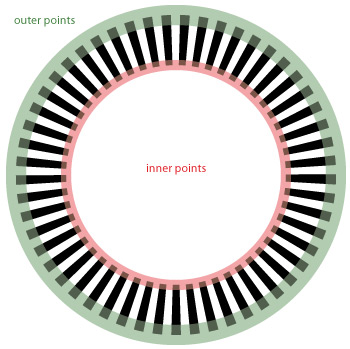
Before using this tool, double click on the pucker icon and a new window will appear. From the Pucker tool Options, set the height and width to 260px, a slightly smaller circle than our circle object which is 270px, uncheck the details options and click OK.
If you want to interactively change the radius of the circle, press Shift + Alt then Click + Hold your mouse button, make sure that the radius of the pucker tool will only affect the inner points.

press and hold the left mouse button.


4 Nisan 2015 Cumartesi

Important Illustrator Tips

MASTER THE NUDGE
This has nothing to do with your spouse (or your mouse for that matter). In Illustrator, using the arrow keys on your keyboard (up, down, left, right) to move your objects in small increments is called “nudging”. The default increment amount is 1pt (.0139 inches), but you can choose a value more relevant to your task at hand. For example, if you’re working in scale, use a number that is easily divisible. Or use specific amounts, like .0625 inches, so you can tap the arrow key 4 times in quick succession and know you’ve moved the object exactly .25 inch. I’ll often adjust the increment value several times a day, as needed.  


Cmd-K [Ctrl-K] Opens the preferences panel and highlights the keyboard increment field. Just enter a numeric value and hit the Enter key to change it.
Arrow: Nudges selected artwork the amount specified in the Preferences dialog.
Shift-Arrow: Nudges selected artwork 10x the amount specified in the Preferences dialog.
Option-Arrow [Alt-Arrow]: Nudges a copy of the selected artwork the amount specified in the Preferences dialog.
Shift-Option-Arrow [Shift-Alt-Arrow]: Nudges a copy of the selected artwork 10x the amount specified in the Preferences dialog.


ALIGN WITH INTELLIGENCE
With Illustrator CS4, you can snap an object’s boundaries to other objects or guides (previous versions only allowed you to snap your cursor to other objects or guides, requiring you to grab objects by their edges or anchor points). To get this to work, however, you have to have Smart Guides turned on—a feature that many find annoying or too “in your face”. Rather than get rid of it, learn to control it. First, open the Smart Guides preferences panel and uncheck all boxes except for Alignment Guides, then press OK. Now you can use a keyboard shortcut to turn Smart Guides on and off as you need it.

Cmd-U [Ctrl-U]: Toggles Smart Guide behavior on and off.


SELECT FASTER
We probably make use of the Selection tools in Illustrator more than anything else, so it’s important to get familiar with NOT constantly switching between them. Instead, learn to use the shortcuts to make them all behave as one cohesive unit.

V: Selection tool (Solid arrow) — the inverted “V” looks like an arrow.
A: Direct Selection tool (Hollow arrow) — the “A” looks like an arrow with a hollow center.

Rather than constantly switch between the two arrow tools, most power users use the Direct Selection tool most often and use these shortcuts:

Cmd [Ctrl]: Temporarily toggles to Selection tool.
Option [Alt]: Temporarily toggles to Group Selection tool.

On the subject of making selections it can often be easier to select art without using tools at all:

Cmd-A [Ctrl-A]: Select all.
Shift-Cmd-A [Shift-Ctrl-A]: Deselect all.

CHANGE OBJECT ATTRIBUTES
How many times do you apply a color only to realize you adjusted the stroke when you meant the fill? How many times do you just want to get an object back to a white fill and a black stroke? Don’t answer—just learn the power moves:

D: Resets an object’s appearance to white fill, 1pt black stroke.
X: Toggles the focus between Fill and Stroke.
Shift-X: Swaps the colors of an object’s fill and stroke.
/ : Applies the None attribute.
Cmd-/ [Ctrl-/]: Applies a new fill (via the Appearance panel).
Shift-Cmd-/ [Shift-Ctrl-/]: Applies a new stroke (via the Appearance panel).

ADJUST STACKING ORDER
I cringe every time I see someone move their mouse up to the Object menu every time they want to bring an object to the front or send it to the back. Due to the stacking nature of vector graphics, these power moves are essential. While there are four possible settings here, the most important ones to remember are Bring to Front and Send to Back.

Shift-Cmd-] [Shift-Ctrl-]]: Bring to front.
Shift-Cmd-[ [Shift-Ctrl-[]: Send to back.
Cmd-] [Ctrl-]]: Bring forward.
Cmd-[ [Ctrl-[]: Send backward.

LOCK AND LOAD (AND HIDE)
Complex artwork—especially those laden with multiple masks—can make for difficult selections. While the new isolation behavior in Illustrator CS4, which allows you to double click on any object to temporarily lock it and bring it to the top of the stacking order, is brilliant, there are still many times when locking or hiding elements can be useful, especially when spending a lot of time focusing on smaller parts of a larger overall illustration.

Cmd-2 [Ctrl-2]: Lock selected object(s).
Cmd-Option-2 [Ctrl-Alt-2]: Unlock all.
Cmd-3 [Ctrl-3]: Hide selected object(s).
Cmd-Option-3 [Ctrl-Alt-3]: Show all.


Hit Shift+Option+Command+3 to hide everything that's not selected

Hit Shift+Option+Command+2 to lock everything that's not selected


Since there’s no way to unlock a specific object, most pros will Unlock all, Shift-click on the object they want unlocked (which deselects it), and then Lock in quick succession. Same applies for Hide/Show. 


YUMMY PASTE
Paste was delicious when you were younger, and just because you’ve grown up, it doesn’t mean you can’t enjoy it now. The Paste command in Illustrator places art in the center of your screen, but you can also paste objects in place — either in front or in back. For those who were familiar with FreeHand, Paste in Front is the same as the feature once known as Clone. Paste in Front and Paste in Back are also helpful when you want pasted objects to be placed within groups or masks.

Cmd-V [Ctrl-V]: Paste.
Cmd-F [Ctrl-F]: Paste in front of the copied object.
Cmd-B [Ctrl-B]: Paste behind the copied object. 


1. Everyone knows the Tracking/Kerning shortcuts Option + Arrows Left or Right. Add Command to that combo to make it really powerful.

2. You may have gone to far with your Tracking or Kerning. You can zero it in one click with Option + Command + Q.

3. To get the Character Panel open one usually clicks Command + T. But if you use Shift + Option + Command + F, you open the Character Panel and hi-lights the fonts name. Works too if the panel is open.

4. Changing the size of type with Shift + Command + Comma or Period, can be made ten times as powerful by adding Options to that combo.  


Fit in window (Clover-0) is hardwired in my muscle memory.  

(while selecting text) cmd + shift + . increases font size by 2pt
(while selecting text) cmd + alt + shift + . increases font size by 10pt

(while selecting text) cmd + shift + , decreases font size by 2pt
(while selecting text) cmd + alt + shift + , decreases font size by 10pt

(while selecting a text line) alt + up arrow reduces leading distance
(while selecting a text line) alt + down arrow reduces leading distance 

26 Şubat 2015 Perşembe

Color Finesse Reserializing

 To force Color Finesse to ask for a registration code again on a Windows system, perform the following steps:
  1. In the Windows Start menu, choose "Run..."
  2. In the "Open:" text box, enter "regedit" and click OK.
  3. You may get a prompt about needing permission to continue. If you do, click Continue.
  4. The regedit application will open and you'll see a list of items on the left side of the window.
  5. If not already open, twirl open the item labeled "Computer"
  6. Twirl open the item labeled "HKEY_CURRENT_USER"
  7. Under that, locate and twirl open the item labeled "Software"
  8. Under that, locate and twirl open the item labeled "Synthetic Aperture"
  9. You should now see a item labeled "Color Finesse 3". There may be multiple versions of Color Finesse installed, so be sure you locate the correct item for the version you want to re-serialize.
  10. Right-click on the "Color Finesse 3" item. You should now see something similar to:

  • Choose Delete from the popup menu.
  • You'll be asked to confirm the deletion. Click Yes.
  • Close the regedit window.
  • Restart After Effects.
  • Open a project, select a layer and apply SA Color Finesse 3 to the layer.
  • You'll be once again prompted for the Color Finesse 3 registration code. Enter the correct one and you'll be up and running with no pink lines


  • Windows 7 Tips #2

    Preview your files

    You can open the preview pane in a window by pressing Alt+P. Items such as photos and PDF files will be previewed in this area when you click them.

    Clean up Live Essentials

     If this causes problems later, or you just decide you don't need it, then Choice Guard may be removed by clicking Start, typing :
    msiexec /x {F0E12BBA-AD66-4022-A453-A1C8A0C4D570} 
    and pressing [Enter].

    Recover locked-up apps 

    When the lockup occurs, click Start, type RESMON and click the RESMON.EXE link to launch the Resource Monitor. 

    Find your frozen process in the CPU pane (it should be highlighted in red), right-click it and select Analyze Wait Chain.

    If you see at least two processes in the list, then the lowest, at the end of the tree, is the one holding up your program. If it's not a vital Windows component, or anything else critical, then save any work in other open applications, check the box next to this process, click End Process, and your locked-up program will often spring back to life.


    Fault-Tolerant Help

    Windows 7 includes a new feature called the Fault Tolerant Help (FTH), a clever technology that looks out for unstable processes, detects those that may be crashing due to memory issues, and applies several real-time fixes to try and help. If these work, that's fine - if not, the fixes will be undone and they won't be applied to that process again.
    While this is very good in theory, it can leave you confused as some applications crash, then start working (sometimes) for no apparent reason. So if you'd like to check if the FTH is running on your PC, launch REGEDIT, and go to HKEY_LOCAL_MACHINE\Software\Microsoft\FTH - any program currently being protected by the FTH will be listed in the State key.
    Experienced users may also try tweaking the FTH settings to catch more problems, and perhaps improve system stability. A post on Microsoft's Ask The Performance Team blog (bit.ly/d1JStu) explains what the various FTH Registry keys mean.


    18 Şubat 2015 Çarşamba

    Preserve Underlying Transparencies

    Right next to the [blending] MODE option of any layer is a little box simply labeled “T”. This is the “Preserve Underlying Transparencies” box. Click it to activate, and After Effects will take the alpha channel (or “transparency”) of the layer directly beneath and it apply it to the current layer.


    For more info
    http://sparksight.com/blog/quick-tip-for-motion-graphics-artists/

    14 Şubat 2015 Cumartesi

    How to Extend or Reset Trial Period of any Software?

    Steps to Reset or Extend trial Period of any Software

    Delete Registry to Extend Trial Period

    In this method you need to find and delete your trial software registry. After trial period is expired, uninstall the software and follow the steps.
    • After uninstalling software, Open RUN (Windows key + R) and type regedit and hit Enter.
    • Now Registry Editor Window will appear and here navigate to HKEY_LOCAL_MACHINE SOFTWARE Your Software name from left pane of this window. If you find any Key name with your software name then just Delete that Key.
    • Similarly navigate to HKEY_CURRENT_USER Software Your Software name and if you find any key with your software name then just Delete it and close the Registry Editor window.
    • Again go to RUN and type %temp% and hit Enter.
    • Now Delete all the things in that folder. Don’t worry these are the temporary files and not necessary for your operating system.
    • Now go to C:Usersyour username hereAppData. Under AppData open all three folders “Local”, “LocalLow” and “Roaming” and check. Under these three folders if you find any folder or anything with your Software’s name, just delete it.
    • Now Restart your PC and install the expired software and you can use it again for trial period. If you install the expired software without following the above steps then you don’t get trial period back.
    http://www.tricksforums.com/2013/11/how-to-extend-or-reset-trial-period-of.html

    7 Şubat 2015 Cumartesi

    AFTER EFFECTS PARENT TAB GONE


    Right click on the top portion of the tabs location and select "columns parent"

    Or! Shift+F4 as the shortcut to reveal or hide this.F4 by itself is the shortcut for 'toggle switches' too.

    31 Ocak 2015 Cumartesi

    After Effects RAM & CACHE Settings

    After Effects users have to configure a lot before having a healthy and smooth performance from software. Here are few notes about settings.

    1 -  Memory & Multiprocessing

    Edit>Preferences>Memory & Multi-processing>

    Check the box under “After Effects Multi-processing” that says “Render Multiple Frames Simultaneously”
    On “CPUs reserved for other applications” choose “1″.
    On “RAM allocation per background CPU” select the LARGEST number listed. NOTE: This will change your “Actual CPUs that will be used” value. …sometimes reducing it. IGNORE THAT.

    2 - Media & Disc Cahce (With SSD)

    Set only the disk cache to use this drive SSD
    Set the Conformed Media database and cache to another drive (your next fastest drive)

    30 Ocak 2015 Cuma

    Windows 7

    I would like to remember some cool stuff in future, if i will use windows 7. Here are some selected tips & tricks which may be useful for you as well. It`s my own selection and if you have any other cool tip, please write it. Thanks.

    Disable Windows Features

    Click Start, type OptionalFeatures and press Enter to launch the Windows Features dialog. Clear the checkbox to the left of any features that are surplus to requirements, and click OK to remove them.

    Customise the log-on screen

    Changing the Windows log-on screen used to involve some complicated and potentially dangerous hacks, but not any more - Windows 7 makes it easy.
    First, browse to HKEY_LOCAL_MACHINE\Software\Microsoft\Windows\CurrentVersion\Authentication\LogonUI\Background in REGEDIT, double-click the DWORD key called OEMBackground (not there? Create it) and set its value to 1.
    Now find a background image you'd like to use. Make sure it's less than 256KB in size, and matches the aspect ratio of your screen as it'll be stretched to fit.
    Next, copy that image into the %windir%\system32\oobe\info\backgrounds folder (create the info\backgrounds folders if they don't exist). Rename the image to backgroundDefault.jpg, reboot, and you should now have a custom log-on image.

    Recover screen space

     right-clicking the Start orb, then Properties > Taskbar > Use small icons

    Restore the Quick Launch Toolbar

    If you're unhappy with the new taskbar, even after shrinking it, then it only takes a moment to restore the old Quick Launch Toolbar.
    Right-click the taskbar, choose Toolbars > New Toolbar, type "%UserProfile%\AppData\Roaming\Microsoft\Internet Explorer\Quick Launch" (less the quotes) into the Folder box and click Select Folder.
    Now right-click the taskbar, clear 'Lock the taskbar', and you should see the Quick Launch toolbar, probably to the right. Right-click its divider, clear Show Text and Show Title to minimise the space it takes up. Complete the job by right-clicking the bar and selecting View > Small Icons for the true retro look.

    Browse your tasks

    If you prefer the keyboard over the mouse, you will love browsing the taskbar using this nifty shortcut. Press Windows and T, and you move the focus to the left-most icon on the taskbar. Then use your arrow keys to change the focus to other icons, and you get a live preview of every window.

    Pin a drive to the taskbar

    The taskbar isn't just for apps and documents. With just a few seconds work you can pin drive icons there, too.
    Right-click an empty part of the desktop, select New > Text File, and rename the file to drive.exe. Drag and drop this onto your taskbar, then delete the original file.
    Right-click your new "drive.exe" taskbar button, then right-click its file name and select Properties. Change the contents of both the Target and Start In boxes to point at the drive or folder of your choice, perhaps click Change Icon to choose an appropriate drive icon, and you're done - that drive or folder is now available at a click.

    Protect your data

    USB flash drives are convenient, portable, and very easy to lose. Which is a problem, especially if they're carrying sensitive data. Fortunately Windows 7 Ultimate and Enterprise have the solution: encrypt your documents with an extension of Microsoft's BitLocker technology, and only someone with the password will be able to access it. Right-click your USB flash drive, select Turn on BitLocker and follow the instructions to protect your private files.

    Windows 7 supports several useful new keyboard shortcuts.
    Alt+P
    Display/ hide the Explorer preview pane
    Windows Logo+G
    Display gadgets in front of other windows
    Windows Logo++ (plus key)
    Zoom in, where appropriate
    Windows Logo+- (minus key)
    Zoom out, where appropriate
    Windows Logo+Up
    Maximise the current window
    Windows Logo+Down
    Minimise the current window
    Windows Logo+Left
    Snap to the left hand side of the screen
    Windows Logo+Right
    Snap to the right hand side of the screen
    Windows Logo+Home
    Minimise/ restore everything except the current window

    Parallel defrags

    The standard Windows 7 defragger offers a little more control than we saw in Vista, and the command line version also has some interesting new features. The /r switch will defrag multiple drives in parallel, for instance (they'll obviously need to be physically separate drives for this to be useful). The /h switch runs the defrag at a higher than normal priority, and the /u switch provides regular progress reports so you can see exactly what's going on. Enter the command
    defrag /c /h /u /r
    in a command window to speedily defrag a system with multiple drives, or enter defrag /? to view the new options for yourself.

    Create a new folder shortcut

    When you need to create a new folder in Windows 7 Explorer, don't reach for the mouse. Just press Ctrl+Shift+N to create the folder in the active Explorer window, then type its name as usual.

    USEFUL LINKS

    http://windows.microsoft.com/en-us/windows/security-essentials-download


    26 Ocak 2015 Pazartesi

    EXIT/ENTER FULLSCREEN MODE AE

    AFTER EFFECTS TO EXIT/ENTER FULLSCREEN MODE

     TR // After Effects`te tam ekrana yanlislikla gecip pencere haline bir turlu donememek gibi bir sorunla karsilasirsaniz. ALT + BOSLUK ardindan  X ile Full Screen moda geri donebilirsiniz.


    ENG// I couldn't find anything for ya on the web or on Adobe's site... it's quite possible that the window went to "restore" mode and got moved up, if this is the case, simply press "ALT+spacebar" then presss the 'X' key... that should take it back to "Fullscreen mode".