18 Mart 2021 Perşembe

Finding windows product key

 Find Windows 10 Product Key on a New Computer

  1. Press Windows key + X.
  2. Click Command Prompt (Admin)
  3. At the command prompt, type: wmic path SoftwareLicensingService get OA3xOriginalProductKey. This will reveal the product key. Volume License Product Key Activation.

18 Nisan 2020 Cumartesi

Transforming Bounding Box Disappearred - Illustrator

If you cant see the bounding box to scale in illustrator;


Windows
Ctrl + SShift + B

Mac
Command-Shift-B


9 Mart 2020 Pazartesi

How to Change Pagefile

Source : https://getalltech.com/how-to-change-size-location-delete-virtual-memory-pagefile-sys-in-windows/

Every one of us might have come across the suggestion on the internet telling you to change the location and size of the pagefile file in Windows PC. In this scenario, you might want to know what precisely the pagefile.sys means. And why it is necessary. Therefore, in today’s article, I would like to discuss regarding pagefile.sys, how to change the location and size as well as how to remove it to free up space in Windows.
So without any delay, shall we walk through the article?

What is pagefile.sys?

A pagefile is a Windows Virtual memory, also known as a swap file or paging file. It acts as software emulation for Random Access Memory (RAM) at the time when the computer runs low on the physically installed memory (RAM), it creates a hidden file named “pagefile.sys.” Well, you will find this file in the C drive of a computer and used to store temporary data of related ongoing processes. In general, Virtual Memory is a Windows disk space utilized when it runs out of physical memory or RAM.
By default, this file can be up to three times the amount of RAM that you currently have installed. On the other hand, when you run out of RAM, the amount of pagefile will be too large for practical use. Due to its large size, many people want to get rid of it. However, it is not recommended to altogether disable it from your system as many programs like offloading memory, cached files, and memory dumps need it on your device. So, unless if you are running out of disk space, and for any other reason, if you wish, then only you should delete the pagefile.sys.

How to Change Pagefile Size / Location in Windows 7:

Step-1 Firstly, go to Start and click on the control panel and then click on System and Security, then select System Option.
Windows Virtual Memory, Virtual Memory, Windows Paging, Virtual Ram Windows 7, Page File Settings, Memory Paging, How to Change Virtual Memory in Window, Windows Virtual Memory Images, Windows Virtual Memory Pictures, Windows Virtual Memory Screenshot
Step-2 In the next window, click on Advanced System Settings located on the left panel.
Windows Virtual Memory, Virtual Memory, Windows Paging, Virtual Ram Windows 7, Page File Settings, Memory Paging, How to Change Virtual Memory in Window, Windows Virtual Memory Images, Windows Virtual Memory Pictures, Windows Virtual Memory Screenshot
Step-3 After entering System Properties, in the Advanced tab, click on the “Settings” button under the Performance section.
Step-4 In the Performance Options window, you need to open and select the Advanced tab and click on the Change button in the Virtual Memory section.
Windows Virtual Memory, Virtual Memory, Windows Paging, Virtual Ram Windows 7, Page File Settings, Memory Paging, How to Change Virtual Memory in Window, Windows Virtual Memory Images, Windows Virtual Memory Pictures, Windows Virtual Memory Screenshot
Step-5 Next, in the Virtual Memory window, you need to uncheck the checkbox “Automatically manage paging file size for all drives.”
Step-6 Now, you need to select the radio button “custom size” and enter the initial size and maximum size for your Pagefile and click on the “Ok” button.
Windows Virtual Memory, Virtual Memory, Windows Paging, Virtual Ram Windows 7, Page File Settings, Memory Paging, How to Change Virtual Memory in Window, Windows Virtual Memory Images, Windows Virtual Memory Pictures, Windows Virtual Memory Screenshot
To save the changes, close all the windows, and restart your system.
That’s all now you got to know how to change Pagefile size.

Follow the below simple steps on How to Change Pagefile Location?

To change the pagefile.sys location you need to follow the Step-1 to Step-4 from above.
Step-7 Now uncheck the checkbox “Automatically manage paging file size for all drives.” Next, you have to select the default paging file drive and click the radio button “No Paging File” and hit on the “Set” button. See the below Image.
Windows Virtual Memory, Virtual Memory, Windows Paging, Virtual Ram Windows 7, Page File Settings, Memory Paging, How to Change Virtual Memory in Window, Windows Virtual Memory Images, Windows Virtual Memory Pictures, Windows Virtual Memory Screenshot
Step-8 In this step, you need to choose the drive where you want to store the paging file and select the radio button “System managed size” and click on the “Set” button to apply the changes.
Windows Virtual Memory, Virtual Memory, Windows Paging, Virtual Ram Windows 7, Page File Settings, Memory Paging, How to Change Virtual Memory in Window, Windows Virtual Memory Images, Windows Virtual Memory Pictures, Windows Virtual Memory Screenshot
Step-9 Once you complete, click on the “Ok” button and close all the windows.
Step-10 Now, you need to restart your system, and you have successfully changed the paging file location in Windows.
Windows Virtual Memory, Virtual Memory, Windows Paging, Virtual Ram Windows 7, Page File Settings, Memory Paging, How to Change Virtual Memory in Window, Windows Virtual Memory Images, Windows Virtual Memory Pictures, Windows Virtual Memory Screenshot
Furthermore, if you want to check it then, go to the drive you just selected, and you will see the paging file with the name “Pagefile.sys,” as shown in the image below.
Windows Virtual Memory, Virtual Memory, Windows Paging, Virtual Ram Windows 7, Page File Settings, Memory Paging, How to Change Virtual Memory in Window, Windows Virtual Memory Images, Windows Virtual Memory Pictures, Windows Virtual Memory Screenshot

How to Change Virtual Memory Settings Using Command Prompt:

Step-11 Click on the Windows Start Menu button and type cmd in the search bar, then right-click on it and choose Run as administrator.
Windows Virtual Memory, Virtual Memory, Windows Paging, Virtual Ram Windows 7, Page File Settings, Memory Paging, How to Change Virtual Memory in Window, Windows Virtual Memory Images, Windows Virtual Memory Pictures, Windows Virtual Memory Screenshot
Step- 12 In the next screen, you will view the elevated command prompt now need to copy and paste the below following command, and press Enter to execute.
REG add “HKLM\SYSTEM\CurrentControlSet\Control\Session Manager\Memory Management” /v “PagingFiles” /t REG_MULTI_SZ /d “C:\pagefile.sys 0 0” /f
You will view the below image.
Windows Virtual Memory, Virtual Memory, Windows Paging, Virtual Ram Windows 7, Page File Settings, Memory Paging, How to Change Virtual Memory in Window, Windows Virtual Memory Images, Windows Virtual Memory Pictures, Windows Virtual Memory Screenshot

Steps to delete Pagefile.sys in Windows 7:

In the above, we have already suggested that not to remove the page file, but for any reason, if you wish to disable, then you can follow the steps below.
  • Firstly, Go to Start and click on the control panel and next, go to System and Security and select System Option.
  • Next, click on Advanced System Settings located on the left panel.
  • Now Under the Advanced tab, in the Performance Section, click on the “Settings” button
  • In the next step, the Performance Options Window open and select the Advanced tab. Now Under the Virtual memory options, click on the Change button. (You can view the Images of Step-1 to Step-4 above for the clear understanding.)
  • Now you find the “Automatically manage paging file size for all drives” option. By default, this option turned on, therefore, Uncheck the option.
  • Next, you need to select the drive that has pagefile.sys.
  • Now you need to choose the No paging file radio button, as shown in the image below.
Windows Virtual Memory, Virtual Memory, Windows Paging, Virtual Ram Windows 7, Page File Settings, Memory Paging, How to Change Virtual Memory in Window, Windows Virtual Memory Images, Windows Virtual Memory Pictures, Windows Virtual Memory Screenshot
  • Finally, click on Set, then press OK, and changes will appear once you reboot the PC.
We hope that this guide had helped you not only to learn changing the size and location as well as deleting the pagefile.sys in Windows but not recommended to change unless you have some reason and know what you’re doing. If there are any misconfigurations, then it may result in severe consequences of your system stability. So, I’d like to suggest its better in leaving the virtual memory settings, and pagefile.sys, the way they are.
Lets us know your opinion about whether to change or delete the virtual memory Settings via below Comment box.

2 Mart 2020 Pazartesi

IFRAME

Only Show a Certain Part of the Page

source:
https://stackoverflow.com/questions/3272071/iframe-to-only-show-a-certain-part-of-the-page

*******************
<br />
<div style="border: solid 2px #555; height: 332px; left: 0px; overflow: hidden; position: absolute; top: 0px; width: 594px;">
<div style="margin-left: -25px; margin-top: -100px; overflow: hidden;">
</div>
<iframe scrolling="no" src="http://example.com/" style="border: 0px none; height: 490px; margin-left: -24px; margin-top: -60px; width: 619px;">
</iframe>
</div>
*********************

<div style="border: 1px solid rgb(201, 0, 1); overflow: hidden; margin: 15px auto; width: 675px;">
<iframe scrolling="no" src="http://teamiwatefsu.blogspot.com/2014/09/jsfiddle-demo-div-display-inline-block.html" style="border: 0px none; margin-left: 13px; height: 954px; margin-top: -422px; width: 660px;">
</iframe>
</div>


12 Kasım 2019 Salı

Adobe After Effects window WAY off screen

If you are also having this problem , which made me crazy, here is the solution.

First somehow find a way to scale the window (which looks like you can only scale vertical, and it doesnt help to see the top edge of the window).

Click and hold OPTION + SHIFT and Scale it like you do it vertical, but it will scale as all, so you can easily scale down to see whole window.


Hope this helps.
All the best!!

11 Mayıs 2017 Perşembe

DOWNLOADING ALL LINKS

Tuesday, 3 March 2015


How To Download All Full Sized Images From Google Image Search Without Any Software - 2 Easy Steps only

Hello Friend,

This blog post is to show you how easily you can download all full sized images from google image search without any software, although there are software's available out there but they are not for free and you may have to buy them for use, BUT today we are gonna use our own method.  So we won't to pay for such simple Tasks.

Here we go it includes only two easy step and you'll be done.

Recommended Posts : How to download all full sized images from Pinterest

Steps :


  1.       Extract all the image urls from google search results.
  2.       Copy these all url's DownThemAll using your favorite DownLoadManager.                      (I suggest to use DownThemAll (add-on) if you use firefox)


Step-1:Extracting Link 

Don't worry you don't have to scan each image URL from page ,Your browser is gonna do that  for yew. Here I've wrote a pretty simply JavaScript  snippet  for that purpose

1: Copy the code from here :

var cont=document.getElementsByTagName("body")[0]; var imgs=document.getElementsByTagName("a"); var i=0;var divv= document.createElement("div"); var aray=new Array();var j=-1; while(++i<imgs.length){ if(imgs[i].href.indexOf("/imgres?imgurl=http")>0){ divv.appendChild(document.createElement("br")); aray[++j]=decodeURIComponent(imgs[i].href).split(/=|%|&/)[1].split("?imgref")[0]; divv.appendChild(document.createTextNode(aray[j])); } } cont.insertBefore(divv,cont.childNodes[0]);


2: Now open the Google images search tab.
Note: Before continuing make it sure to load all thumbnails by scrolling the page down to bottom other wise only first few image URL will be extracted

3: Press ctrl+shift+i combination. A pop up window will open click on the tab named console and paste
   the code there using hotkey ctrl+v and press Enter;


Note: If it's first time you've done that the pop up window may appears at the right side of screen in vertical position, click on the rectangular icon located in between the cross and gear icon it will bring the pop up window to the bottom of page

Extraction is Done: as soon as you press enter a list containing all the image url's will be
displayed at the top of the page This means Extraction is done completely


Step-2:Downloading Images.

Final step is to download the images which is the easiest part.You need a download manager for this purpose i recommend using IDM since its one of the best download managers available 1- Copy the extracted Urls and switch to IDM.
2- Click Task located at top left corner3- Select "Add batch download from clipboard".
4- Press Check all and click on ok button
5- Check Start Que Processing and again press ok


All images will be downloaded to the directory you've selected

11 comments:

FreeEndlessInfo.com said...
Not working. it just shows http and https no link. Did google changed the image search code.Please check it.
kaleem ullah said...
hello friend, thank you for the feedback the script is fixed now.
Kirankumar Devaraja said...
hi Kaleem , can u please give me the Script
https://www.google.ie/search?q=blouse+designs+images&espv=2&biw=1920&bih=925&tbm=isch&tbo=u&source=univ&sa=X&ved=0ahUKEwjts7qBw-jPAhULIMAKHRmLD4AQsAQIGg

kaleem ullah said...
Link extraction script is already given above, what script are you talking about?
jeriel bright said...
Or you can click on the picture and drag it to any part of your library.

Tushar said...
Thank you so much it helped :)
It worked absolutely fine.
Semoga Bermanfaat said...
work
thanks Mr...
Gökhan KARAGÖZ said...
This is awesome! Thanks lots of.
Plus, can you explain the code? I would like to learn algorithm about that.
kaleem ullah said...
This code just scrapes all the images in the webpage and lists the source property of images. you may check this out it's similar
https://32hertz.blogspot.com/2015/06/how-to-download-all-pictures-from.html

Bubu Daba said...
You can save it as bookmark, just type "javascript:" and the code when editing the url field
Hao Tang said...
Thanks, you code works like a charm to download full sized images. Do you mind sharing the script that could download all thumbnails instead of full sized images from google image search?


10 Nisan 2015 Cuma

How to Create Vector Sun


This tuttorial is from
http://www.webdesign.org/vector-graphics/adobe-illustrator/how-to-create-vector-sun-rays.18455.html


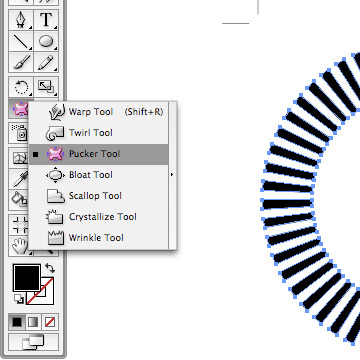
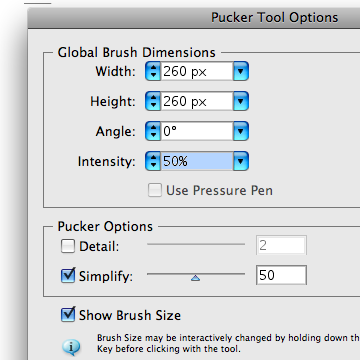
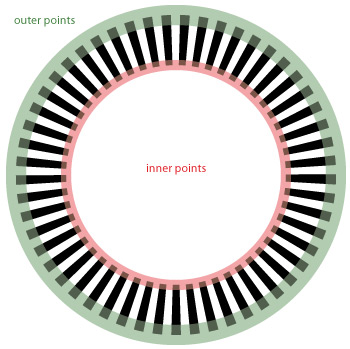
Before using this tool, double click on the pucker icon and a new window will appear. From the Pucker tool Options, set the height and width to 260px, a slightly smaller circle than our circle object which is 270px, uncheck the details options and click OK.
If you want to interactively change the radius of the circle, press Shift + Alt then Click + Hold your mouse button, make sure that the radius of the pucker tool will only affect the inner points.

press and hold the left mouse button.